Importing in bulk

Using the import templates
July, 2022

You can easily import multiple-choice questions in bulk by utilizing import templates.

  1. Choose the most appropriate import template for your specific use-case and download it.
    1. Open the downloaded import template and follow the instructions provided on the first sheet.

      Choosing the right template

      Consider the following statements to help you choose the appropriate template

      • How many answer choices are there for each question?
        • How many tags will be assigned to each question?
          • How many dimensions do you want to assign to each question?

            List of templates

            If none of the templates below meet your needs, please contact us and provide additional information about what you require and why.
            3 Options and 1 Tag4 Options and 1 Tag5 Options and 1 Tag
            3 Options and 2 Tags4 Options and 2 Tags5 Options and 2 Tags
            3 Options and 3 Tags4 Options and 3 Tags5 Options and 3 Tags
            2 Options, 3 Tags and 1 Dimension4 Options, 3 Tags and 1 Dimension5 Options, 3 Tags and 1 Dimension

            Instructions

            • Download the the template that best suits you from the templates, and open the file with Microsoft Excel
              • Read the instructions on the first page
                • On the first page, change the values of the 2 settings based on your preference. Both options will apply to all questions in this import:
                  • Shuffle Options: “true” or “false” – Does the order of the choices need to be random ?
                    • Display Options in: “Row” or “Column” – Should the choices appear side by side or vertically stacked ?
                    • On the second page of the template, fill in the information about the questions
                      • In the Question column, enter the question text first, followed by one row space, and enter each choice on one row. Type 100 in the column next to the choice you want to select as correct.
                        • In the Folder column, enter the name of the folder where the question will be saved.
                          • In the Tag Name column, enter the name of the tag you will associate with the question.
                            • In the Tag Value column, enter the value of the tag you will associate with the question.
                              • In the Point column, enter the default point of the question.

                                Next 3 items are for templates with dimensions option only

                                • In the Dimension column, enter the dimension name for the question.
                                  • In the Dimension Point column, enter the point you want the candidate to earn in the given dimension if their answer is correct.
                                    • In the Dimension Negative Multiplier columns, enter the point you want to be deducted from the given dimension if the candidates does not answer the question correctly. (Reminder: you do not need to type in the negative symbol in front of the value. The system will automatically add it in when you go through the import process.)

                                      You should only enter or modify data in cells painted gray. Do not change values in cells that are not painted gray.
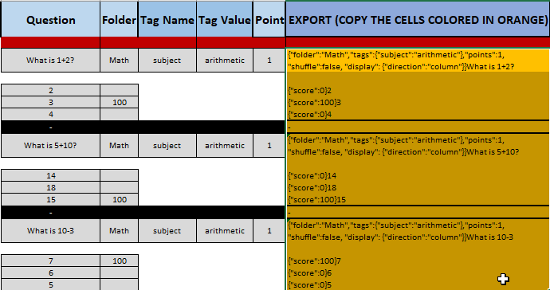
                                      • Likewise, for all your questions, complete the entry to the areas reserved for you in the template.
                                        • Copy all the cells painted in orange with the codes produced by the template at once.

                                          Ensure the last row of the copied content is not a dash “-“. Otherwise, the system might view it as an invalid input when pasting it in.
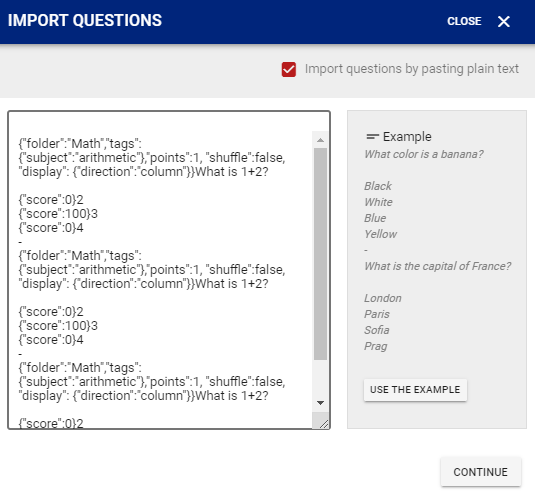
                                          • Open the question bank.
                                            • Press the Add (+) button and click Import Questions in the pop-up menu .
                                              • In the top right corner of the new window that appears, select the Import questions by pasting plain text.
                                                • In the text entry box that appears, paste the orange painted cells that you copied in the template
                                                  • Click Continue.
                                                    • The system will provide you with a preview of the questions to be imported.
                                                      • Complete the import process by clicking Save .

                                                        Author

                                                        Mustafa Ekim

                                                        Mustafa Ekim, founder of TestInvite and QuizCV, brings nearly a decade of expertise in building online assessment platforms for custom, secure tests.
                                                        Go Back
                                                        Talk to a representative
                                                        Figure out if TestInvite is a good match for your organization
                                                        Book a demo